avatar

ROOT CA signed Certificate

September 15, 2021 in Web Server

How it works:

There are many CA (Certificate Authorities) around the world that they can generate a certificate for you once you provide the required information and identify that you are the owner of the domain or subdomain where you are planning to use the certificate. Most of them are providing this service for an amount money but there are also free solutions. This is something that you need to do if you want to host a service like a web site and you want that everything that is transmitted from any client to your server and vice versa will be encrypted. In the other hand the clients also need to be sure that they can access your server in a secure way. And since they are not able to check your certificate we are relying to a CA to do the job. But if you need to protect an internal website that is running inside your company, then you can become a local CA. Here is how


Became a local CA

issue the following command in order to create a new key that we will use later for our CA certificate.

openssl genrsa -aes256 -out CA.key 4096

You should provide a password twice and the key is ready to use.
The output should look like this:

Generating RSA private key, 4096 bit long modulus (2 primes)
…………………………………………………………………………………..++++
…………………………………………………………………………………………….++++
e is 65537 (0x010001)
Enter pass phrase for CA.key:
Verifying -- Enter pass phrase for CA.key:

Now you have a file that is called CA.key and the contents should be like that:

—--BEGIN RSA PRIVATE KEY—--
Proc-Type: 4,ENCRYPTED
DEK-Info: AES-256-CBC,438387DEFA5FD5275315FD562F1BC0D8

GXs5bW36Ifl0PvP4VYKktVLyxzpHNTkjh+dxMCfQRp9RfKBZl6rjVqYd2hovC01o
DzqIzeVMkT7GWUw3zYUulIYqXDRALTwNa8X5cEF2qtxFQCmMNpK1uHSl761Agtqm
—many lines have been removed—
3vOqEUBD7CNFeS4lkGG4xrsZBdALEFRyPPbzpnIrDwY+jvoLDVSFy7jXncgwFEem
jiUwxpBySCKAP8oMPISlTwh+K9lJ0JgMN1TahCMkdYB8GcTud5+wR8hvl4Wc7gzM
—--END RSA PRIVATE KEY—--

Create a CA Certificate:

Now we need to create a certificate that we are going to install on all systems in our company that they will use the certificates that we are going to create with this CA certificate. So this is a root certificate that a computer is using to identify all certificates that are issued from our CA. Now you need to issue the following command and provide the password from the key we created in the previous step and answer the questions. 

openssl req -x509 -new -nodes -key CA.key -sha512 -days 365 -out CA.pem
Enter pass phrase for CA.key:
You are about to be asked to enter information that will be incorporated
into your certificate request.
What you are about to enter is what is called a Distinguished Name or a DN.
There are quite a few fields but you can leave some blank
For some fields there will be a default value,
If you enter ‘.’, the field will be left blank.
—--
Country Name (2 letter code) [AU]:GR
State or Province Name (full name) [Some-State]:-
Locality Name (eg, city) []:Athens
Organization Name (eg, company) [Internet Widgits Pty Ltd]:MyCompanyName
Organizational Unit Name (eg, section) []:IT
Common Name (e.g. server FQDN or YOUR name) []:MyCompanyName.local
Email Address []:info@MyCompanyName.local

Create an SSL certificate using our CA

Now as before we will need to create another key so we can generate a CSR file with all info about our domain and then we will use this file to issue a certificate.

Create the Key:

openssl genrsa -out allaboutlinux.local.key 4096

Create the CSR file:

openssl req -new -key allaboutlinux.local.key -out allaboutlinux.local.csr
You are about to be asked to enter information that will be incorporated
into your certificate request.
What you are about to enter is what is called a Distinguished Name or a DN.
There are quite a few fields but you can leave some blank
For some fields there will be a default value,
If you enter ‘.’, the field will be left blank.
—--
Country Name (2 letter code) [AU]:GR
State or Province Name (full name) [Some-State]:-
Locality Name (eg, city) []:Athens
Organization Name (eg, company) [Internet Widgits Pty Ltd]:MyCompanyName
Organizational Unit Name (eg, section) []:IT
Common Name (e.g. server FQDN or YOUR name) []:allaboutlinux.local
Email Address []:info@allaboutlinux.local

Please enter the following ‘extra’ attributes
to be sent with your certificate request
A challenge password []:MySecurePassword!
An optional company name []:

Create the certificate from CSR signed by the CA:

openssl x509 -req -in allaboutlinux.local.csr -CA CA.pem -CAkey CA.key -CAcreateserial -out allaboutlinux.local.crt -days 100 -sha512

Now you can use this certificate on the server side and as long as the clients already have the CA certificate they will be able to identify this certificate and any other that we will create in the future by using the same CA.

avatar

install Netbeans PHP IDE in Ubuntu

September 16, 2017 in Web Server

install Netbeans in Ubuntu.

Installing required software.

Before we install Netbeans we need to install Apache2 and Php.

sudo apt-get update
sudo apt-get install apache2 php

Now lets install Netbeans

sudo apt-get install netbeans

Now we need to add the php support for Netbeans. go and download that from the official website https://netbeans.org/downloads/index.html

Once the download completes then do to Downloads directory make the file executable and run it.

cd ~/Downloads/
sudo chmod +x netbeans-8.2-php-linux-x64.sh
./netbeans-8.2-php-linux-x64.sh

Then follow the wizard and install it.

This script will update the Netbeans and add php components into the IDE.

before we create a new project we need to add write permissions in the Apache root directory so netbeans will  be able to write directly into this directory.

sudo chmod 777 /var/www/html/

Lets create a new project.

Open Netbeans from Ubuntu Menu and click on "File" and then "New Project"

Select "PHP" --> "PHP Application" and click "Next"

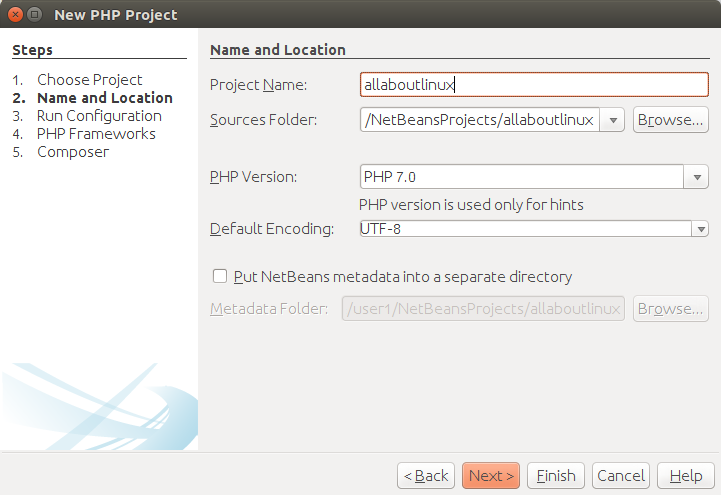
Then change the project name and click next.


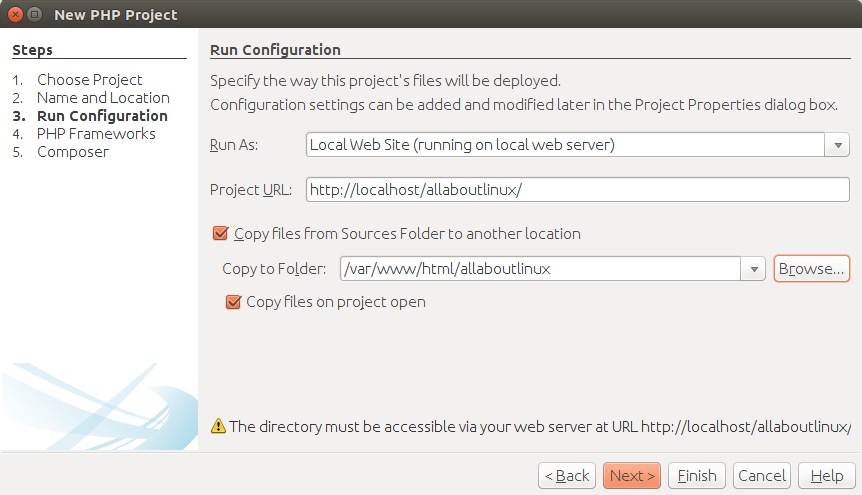
On the next window click the check box "copy files from Sources Folder to another location" and add the "html" after "/var/www/"


Now click finish and lets create a small php project where we will try to authenticate a user.

in the index.php just delete everything and copy the following:

<?php
   ob_start();
   session_start();
?>
<html lang = "en">
   
   <head>
      <title>allaboutlinux.eu</title>
      <link href = "css/bootstrap.min.css" rel = "stylesheet">
    
      
   </head>
	
   <body>
      
      <h2>Enter Username and Password</h2> 
      <div class = "container form-signin">
         
         <?php
            $msg = '';
            
            if (isset($_POST['login']) && !empty($_POST['username']) 
               && !empty($_POST['password'])) {
				
               if ($_POST['username'] == 'allaboutlinux.eu' && 
                  $_POST['password'] == 'aal.eu') {
                  $_SESSION['valid'] = true;
                  $_SESSION['timeout'] = time();
                  $_SESSION['username'] = 'allaboutlinux.eu';
                  
                  echo 'You have entered valid use name and password';
                  header("Location: http://localhost/allaboutlinuxeu/correct_password.php");
               }else {
                  $msg = 'Wrong username or password';
               }
            }
         ?>
      </div> <!-- /container -->
      
      <div class = "container">
      
         <form class = "form-signin" role = "form" 
            action = "<?php echo htmlspecialchars($_SERVER['PHP_SELF']); 
            ?>" method = "post">
            <h4 class = "form-signin-heading"><?php echo $msg; ?></h4>
            <input type = "text" class = "form-control" 
               name = "username" placeholder = "username" 
               required autofocus></br>
            <input type = "password" class = "form-control"
               name = "password" placeholder = "password" required>
            <button class = "btn btn-lg btn-primary btn-block" type = "submit" 
               name = "login">Login</button>
         </form>


      </div> 
      
   </body>
</html>

Then lets adds one more php file that will just say "Login succesfull" if you provide the right username and password.

Right click on "Source files" --> "New" --> "PHP File…" and give the filename that we added in the index.php as redirected page. In this case "correct_password.php". Delete everything and paste the following:

<!DOCTYPE html>
<!--
To change this license header, choose License Headers in Project Properties.
To change this template file, choose Tools | Templates
and open the template in the editor.
-->
<html>
    <head>
        <meta charset="UTF-8">
        <title></title>
    </head>
    <body>
        <?php
        // put your code here
        echo("Login succesfull");
        ?>
    </body>
</html>

Now click on "Run" --> "Rub Project" or hit "F6″. If everything was right then you should see a login page and if you give as username "allaboutlinux.eu" and password "aal.eu" you will get redirected into the correct_password page.

Have fun! Create your own pages and post your results here.

avatar

iSCSI server with OpenSuse

August 7, 2017 in Web Server

iSCSI server with OpenSuse.


In this tutorial i will try to demonstrate how you can create an iSCSI target and then mount it on another machine.

For that i will use the latest available OpenSuse at this time which is the Leap 42.3. I guess that this can be followed by other versions also.

login to OpenSuse, open a terminal and type:

sudo zypper update
sudo zypper install yast2-iscsi-lio-server


Once this is over then you need to open yast and then find and open the "iSCSI LIO Target".

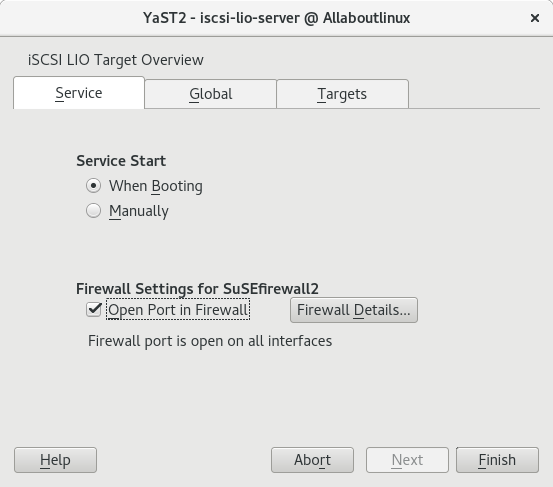
On the first tab "Service" under the section:

"Service start"

Choose if you want the server to run automatically on startup of O.S. or manually.

"Firewall settings for SuSEfirewall2″

click the checkbox "Open port Firewall" if you want to let the system do it for you, otherwise you can also do that manually later on.


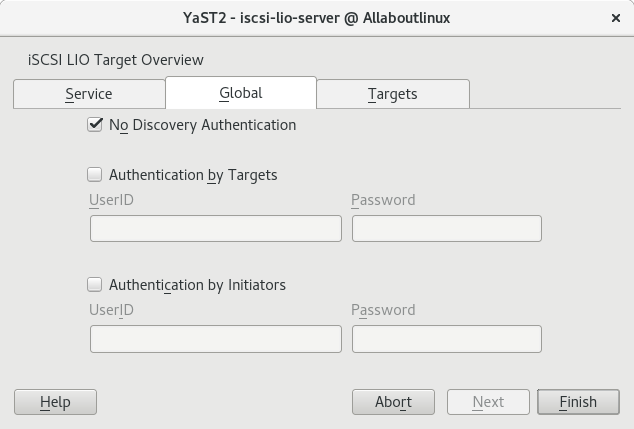
After that click on the next tab "Global" and the Discovery credentials. You can let that free by clicking the "No discovery Authentication’ 


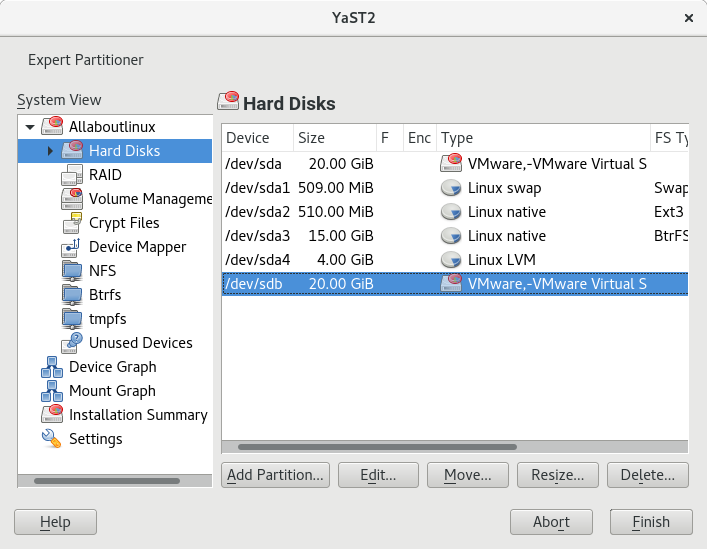
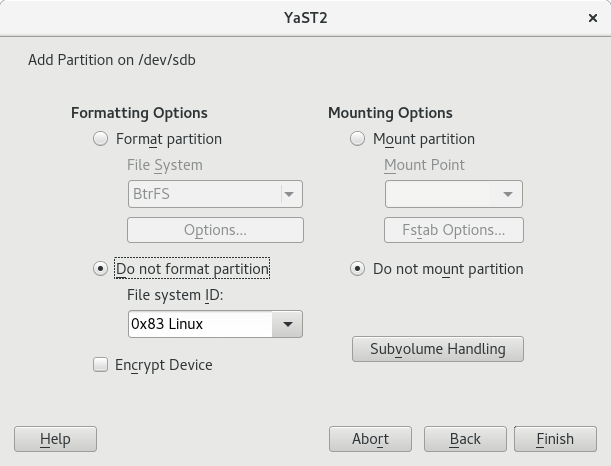
On the last tab "Targets" we are going to define the Targets, but before we do so we need to prepare the partition. On this example i use  a secondary disk that it is attached to the computer as raw and has nothing on it. Go to yast again and open "Partitioner". A warning will come up and you can click yes. On the Partitioner click on the left "Hard Disks" and then select the disk that you wanna use. In my case it is the "/dev/sdb". Click on the "Add Partition", select "Primary Partition" and click "Next".  On the next window select "Maximum Size" in order to use the entire disk and then click "Next". If you asked about the role of this partition then select "Operating System" and "Next".

In the last step it is important to select "Do not format partition" and "Do not mount partition" and then click "Finish". 

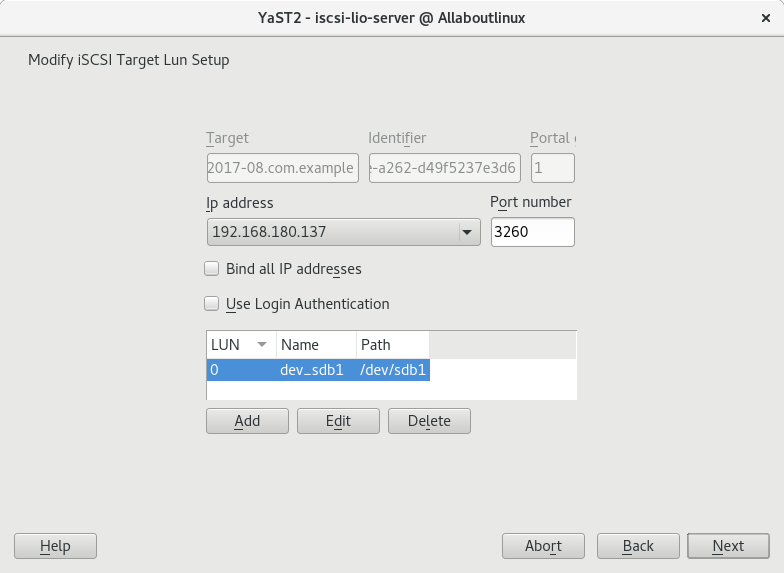
Ok so now we can go back to "iSCSI LIO Target" and click on the last tab "Targets" and then click "Add". Now most of the textboxes are filled by the system and you can modify them if needed but i will let them to default for now. This should look like the following picture but with different Target name, Identifier, and IP address.

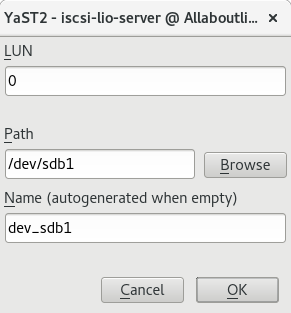
Click in "Add" so we can add our first and only in that case LUN. If you wish to add more just repeat the following process. The LUN number in the following window should be already there and if this is your first LUN then it should be "0″. Now the Path needs to be the path to partition that we created before. In my case it is /dev/sdb1/. you can also add a name but if you let it empty the system will create one for you. Click "OK" and "Next" on the next window.

Now you should be on the following window.


Click the "Add" and provide the Initiator name that are going to connect to that target. Only the initiators with the identical name will be able to connect. We will use this name later on when we will try to connect that from another machine. This name has a specific syntax and it has to be like that:

iqn:yyyy-mm.reversed.domain.name[:identifier]  or something like that: eui:yyyy-mm.reversed.domain.name[:identifier] I ll use the following but you can modify that as you wish "iqn.2017-04.eu.allaboutlinux:my.first.iscsi"

click "OK"


Now you should be able to see the target in the target list ans you can click Finish. The export is created and the server is running!


Mount the target into another computer in the same network.

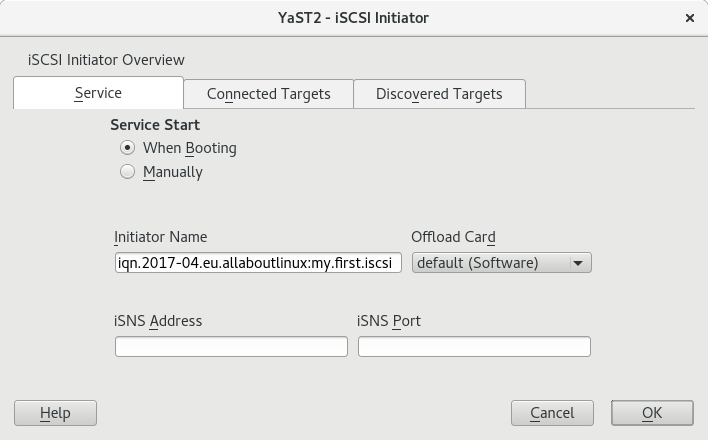
lets try now to connect this to another computer. I ll use again another OpenSuse computer and after opening yast this time i will select "iSCSI Initiator". The first tab "Service" appears and you can select if that will run automatic on system boot or manually under the "Service Start" section. Then you need to specify the "Initiator Name" that we defined before. 


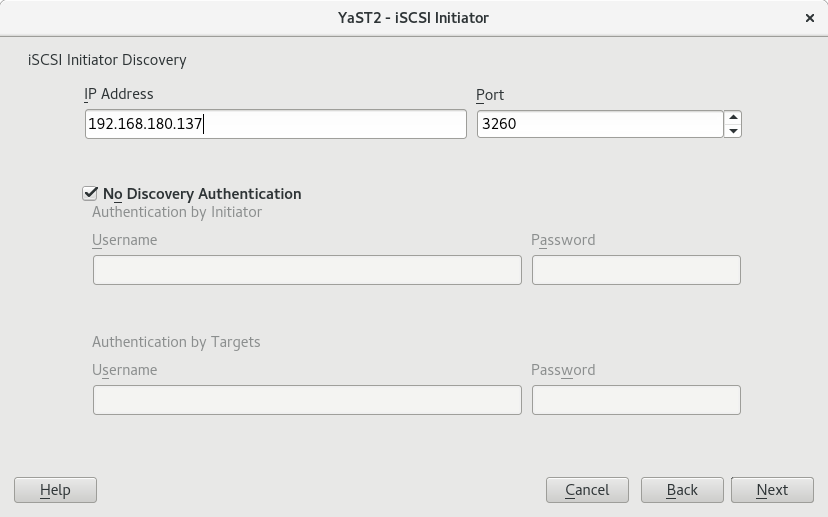
Now you need to go to the 2nd tab "Connected Targets" and click on "Add". On the upcoming screen you need to type the IP address of the iSCSI target and click next.

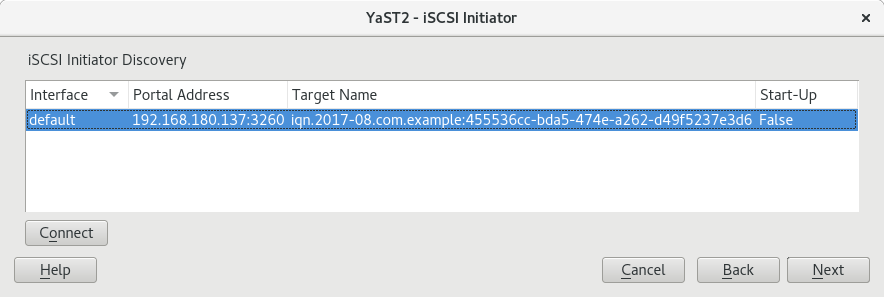
Now you should be able to see the target and you have to click on connect.

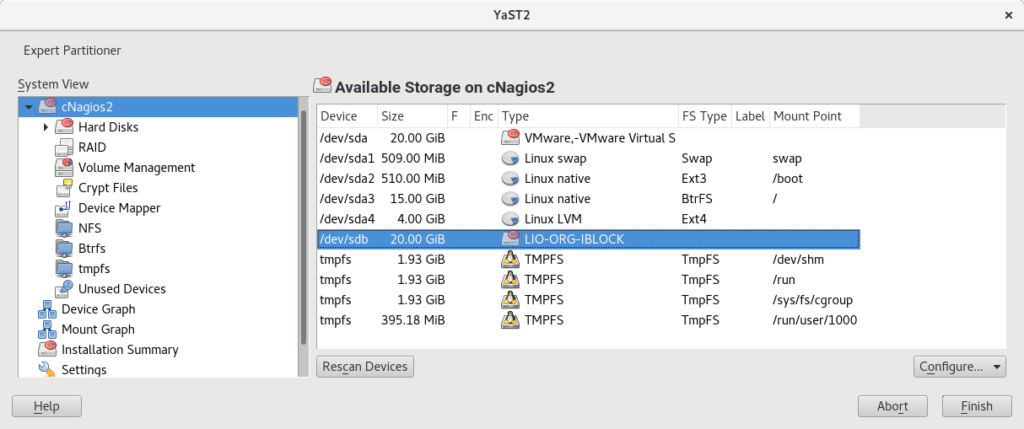
On the upcoming window under the "Startup" select "automatic" and the initiator will connect to the target automatically when the server is coming up. Click next and you will be able to see that the target is now connected. Click on "Next" and "Finish". Now you you should be able to see the disk under the list of your disks in the "Partitioner". Go to yast once again and click on "Partitioner".

The disk is not yet formatted nor mounted so lets to that. Right click on the disk and select "Add Partition" --> "Primary Partition" --> "Maximum Size" so we can use the whole disk. --> "Operating System" --> select the file system you wish to use and the mount point.


avatar

install latest Darktable in Debian 8

September 17, 2015 in software, Web Server

install Darktable in Debian 8

There is an easy way to install darktable in Debian by issuing the command "sudo apt-get install Darktable" but this one will install an old version of Darktable.
If you need the latest stable one then you need to follow those steps:
open a terminal and type:

sudo apt-get update

sudo apt-get build-dep darktable

sudo apt-get install libglew-dev libcanberra-gtk-module mesa-opencl-icd mesa-utils-extra

Now go to the official website http://www.darktable.org/ and download Darktable. you should get a file with a name like darktable-x.x.x.tar.xz where x is the version of Darktable.

go to Downloads directory and extract that file.

cd ~/Downloads/

tar xvf darktable-1.6.8.tar.xz

now go into darktable directory and start the build process by typing:

cd darktable

./build.sh

Then issue the following command to install it.

avatar

Install vmware player in Debian 8

September 17, 2015 in Web Server

Install vmware player in Debian 8


Download the installation files from vmware official site https://my.vmware.com/web/vmware/free#desktop_end_user_computing/vmware_workstation_player/ .

Now you should have a file like VMware-Player-12.0.0-2985596.x86_64.bundle.

open a terminal and execute it:

cd ~/Downloads/

chmod +x VMware-Player-12.0.0-2985596.x86_64.bundle

sudo ./VMware-Player-12.0.0-2985596.x86_64.bundle

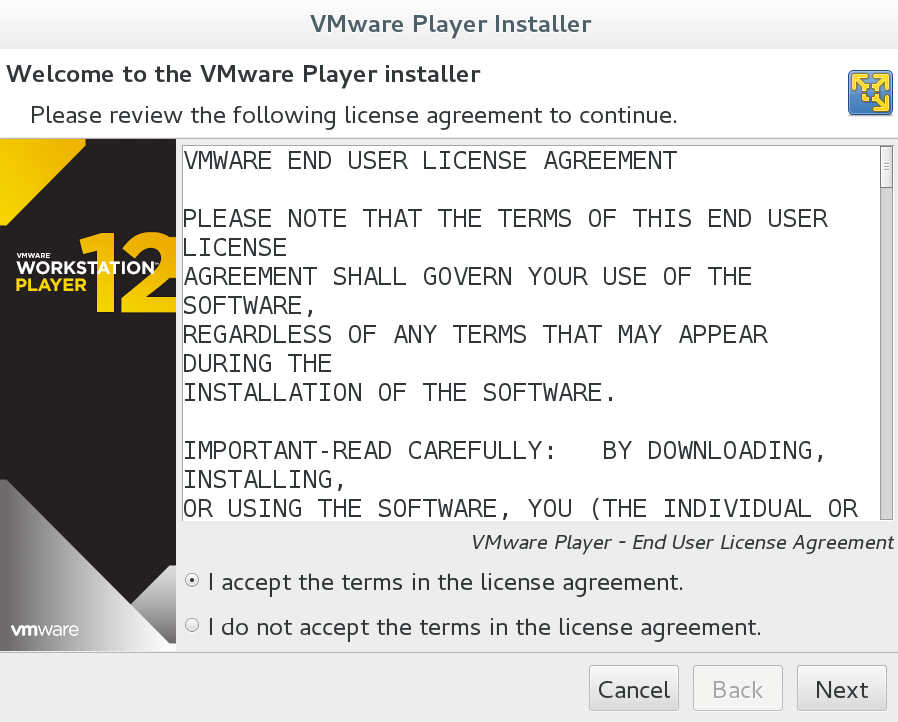
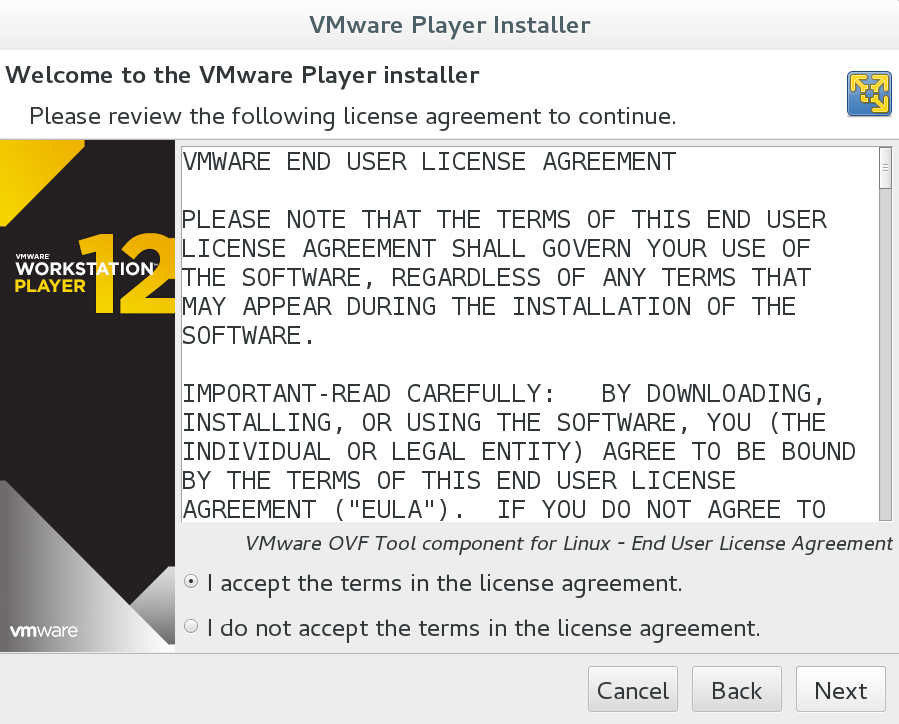
This will bring up the installation dialog


You need to accept the agreement in order to continue. Take a look before you accept it.

avatar

Install Thunderbird in Debian 8

September 17, 2015 in software, Web Server

Install Thunderbird in Debian 8

Lets begin by downloading Thunderbird.

Visit the official Thunderbird site https://www.mozilla.org/thunderbird/ and click on Download button.

This will download a file like thunderbird-xx.x.x.tar.bz2 where "x" is the current version of Thunderbird.

Lets move that file in /usr directory.

sudo mv ~/Downloads/thunderbird-xx.x.x.tar.bz2 /usr/

Go to /usr and decompress Thunderbird:

cd /usr

sudo tar xvf thunderbird-xx.x.x.tar.bz2

Remove the compressed file:

sudo rm thunderbird-xx.x.x.tar.bz2

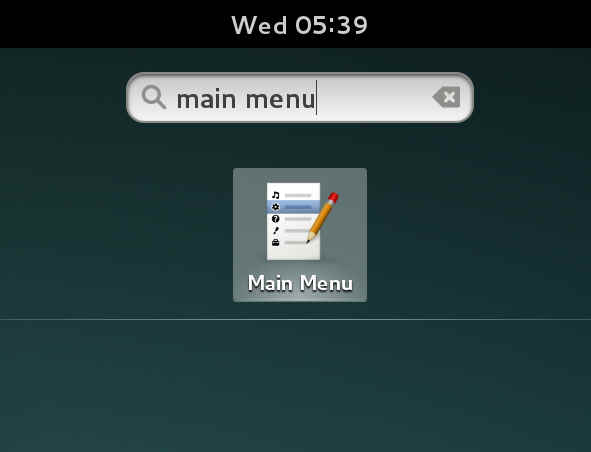
lets create the launcher. Press the "Super Key" (this one is located on your keyboard between "ctrl" and "alt". In windows world is also called "Windows Key")

then type "main menu"

main_menu

avatar

Install Filezilla in Debian 8

September 16, 2015 in Web Server

Install Filezilla in Debian 8

Lets begin by downloading Filezilla.

Visit the official Filezilla site https://filezilla-project.org/download.php?type=client and click on Download button.

This will download a file like FileZilla_x.xx.x_x86_64-linux-gnu.tar.bz2 where "x" is the current version of Filezilla.

Lets move that file in /usr directory.

sudo mv ~/Downloads/FileZilla_x.xx.x_x86_64-linux-gnu.tar.bz2 /usr

Go to /usr and decompress filezilla:

cd /usr

sudo tar xvf FileZilla_x.xx.x_x86_64-linux-gnu.tar.bz2

Remove the compressed file:

sudo rm FileZilla_x.xx.x_x86_64-linux-gnu.tar.bz2

lets create the launcher. Press the "Super Key" (this one is located on your keyboard between "ctrl" and "alt". In windows world is also called "Windows Key")

then type "main menu"

main_menu

avatar

fstab in ubuntu

July 11, 2013 in Web Server

How to configure fstab in Ubuntu

what is fstab?

In fstab or FileSystemTABle,you will be able to find informations regarding all your mount points in your computer.

In other words is a list of disks and partitions and also include information regarding where they are mounted in your Operating System.

It maybe sounds a bit complicat right now but i think that you will be able to understand if you see an example.

I will post here an fstab file (you can find yours under /etc/fstab)


# <file system> <dir>         <type> <options>       <dump> <pass>
/dev/sda1         /                   ext4      defaults             1           1
/dev/sda2        /usr              ext4      defaults              1           1

/dev/sda4        /home         ext4       defaults             0            0
/dev/sda5         swap          swap    defaults              0           0
/dev/sdc1         /data2         ext4      defaults,auto     0           2
/dev/sdb1         /data            auto     defaults,auto     0           2

Lets check this table:

on the first column:

Here you can find informations regarding the hard drives and partitions. In this computer there are 3 Hard Drives sda1, sda2, sda3 . On the first hard drive the OS is installed and the other 2 hdds are there for some additional storage. The first hard drive is divided into partitions but the other hard drives are not in this example.

On the second column:

Here you can see where in your file system are mounted your hard drives and your partitions

On the third column:

You can specify here what is the file system of your partitions. Some of the options are: ext2, ext3, ext4, nfs, reiserfs, xfs, jfs, smbfs, iso9660, vfat, ntfs, swap, and auto. the auto   is my favourite because in that mode you let the O.S. decide what kind of file system is your partition. This is very useful for CD and DVD ROMS.

On the forth Column:

Here you can specify how the system will mount your drives and partitions. You can add more than 1 option with ","

auto -- file system will mount automatically at boot.

noauto -- the filesystem is mounted only when you want to mount it (you can the mount command)

exec -- allow the execution binaries that are on that partition (default).

noexec -- do not allow binaries to be executed on the filesystem.

ro -- mount the filesystem read only.

rw -- mount the filesystem read-write.

user -- permit any user to mount the filesystem

nouser -- only allow root to mount the filesystem (default).

suid -- allow the operation of suid, and sgid bits.

nosuid -- block the operation of suid, and sgid bits.

noatime -- do not update inode access times on the filesystem. Can help performance.

nodiratime -- do not update directory inode access times on the filesystem. Can help performance.

relatime -- update inode access times relative to modify or change time. Access time is only updated if the previous access time was earlier than the current modify or change time (similar to noatime, but doesn’t break mutt or other applications that need to know if a file has been read since the last time it was modified). Can help performance.

sync -- I/O should be done synchronously.

async -- I/O should be done asynchronously.

defaults -- this is the most used and it includes the default mount settings (equivalent to rw,suid,dev,exec,auto,nouser,async). I also like this one 😉

Fifth Column

This is where you tell to dump utility if it needs to be backuped or not. if its 0 the dump will ignore this one. if it is 1 the dump will include this drive in the backup process.

Sixth Column.

this is the priority on check disk and can be 0,1,2. the root file system must have 1 and that means high priority on check. the other can be 0 no check or 2 check after file system.

avatar

Install Google Chrome in Ubuntu 13.04

April 28, 2013 in software, Web Server

Google Chrome in Ubuntu

Dependencies:

libdev0.

Download this package from here (right click and save link as…)and install it with Ubuntu Software Center or in Terminal:

navigate to the directory where the package is:

cd ~/Downloads

sudo dpkg -i libudev0_175-0ubuntu19_i386.deb


Install chrome:


Now just go to the following link:

http://www.google.com/chrome and download the chrome package.

then install it with Ubuntu Software center or from the Terminal like before.

Enjoy the Google Chrome

avatar

Manage Cisco Switch / Router from Linux

April 14, 2013 in Services, Web Server

Connect your Cisco Switch / Router on Ubuntu

Requirements for Configure a Cisco device from Console port:

A Host machine with your preferred O.S. In this case I’m using an Ubuntu 12.04 LTS.

A serial port in your computer motherboard or a USB to RS232(Serial) Converter.

A text based terminal emulation (i use minicom in this example)

Its also useful to install a TFTP server on your machine if you want to copy file from or to your Cisco switch / Router. I choose to use the tftpd-hpa

Check for active Serial ports on Linux:

Before we proceed we need to check all the available Serial ports on your machine and write down the port name because we will need it for configuring minicom. Open a terminal and type :


dmesg |grep tty

output:

In my case i have a pl2303 USB to Serial Converter and the name of this device is "ttyUSB0″